
Starlink Mini in a Tesla Model Y: 12V Power, Wiring, Signal and Range (Owner Test)
Starlink Mini in a Tesla Model Y: 12V Power, Wiring, Signal and Range (Owner Test)

Plenty of Tesla owners have had the same thought: Tesla and Starlink are both Musk companies, so putting a Starlink Mini in a Model Y and turning it into a car that stays online wherever it goes should be easy, right? I thought so too. Then I opened the Mini’s box and found that the included power supply only plugs into a wall outlet, and the car’s handy USB-C ports can’t run it.
I drive a 2023 Tesla Model Y and started using a Starlink Mini in it in early September 2026. After some trial and error, the setup I settled on is simple: a high-power car charger in the 12V socket inside the Model Y’s centre console, and a USB-C-to-DC cable running to the dish. No tools, no trim panels removed, a few minutes to install and a few seconds to take out.
This guide walks through the whole thing from a Tesla owner’s point of view: the ways a Tesla gets online, why the USB-C ports don’t work, what the 12V socket can deliver, how to route the cable safely, whether the signal is good enough through the windshield, how much range it costs, what to watch for while driving, and which Roam plan makes sense. Model 3, Model S and Model X owners are in almost the same situation, and I note the differences along the way.
Disclosure: this article contains JOWUA affiliate links and my Starlink and Tesla owner referral links. If you order through them I may earn a small commission or referral credit at no extra cost to you; see our disclosure page. JOWUA provided the cable and car charger free for review and had no say over the content. Everything below is my own experience.
The short version
- Powering a Starlink Mini over USB-C takes a 20V/5A (100W-class) USB PD supply. The USB-C ports in a Model 3, Y, S or X don’t output 20V, so plugging the Mini straight in doesn’t work.
- What works: a high-power PD 3.1 car charger in the centre-console 12V socket, with a USB-C-to-DC cable from its main port to the dish. I use JOWUA’s cable and 165W car charger kit.
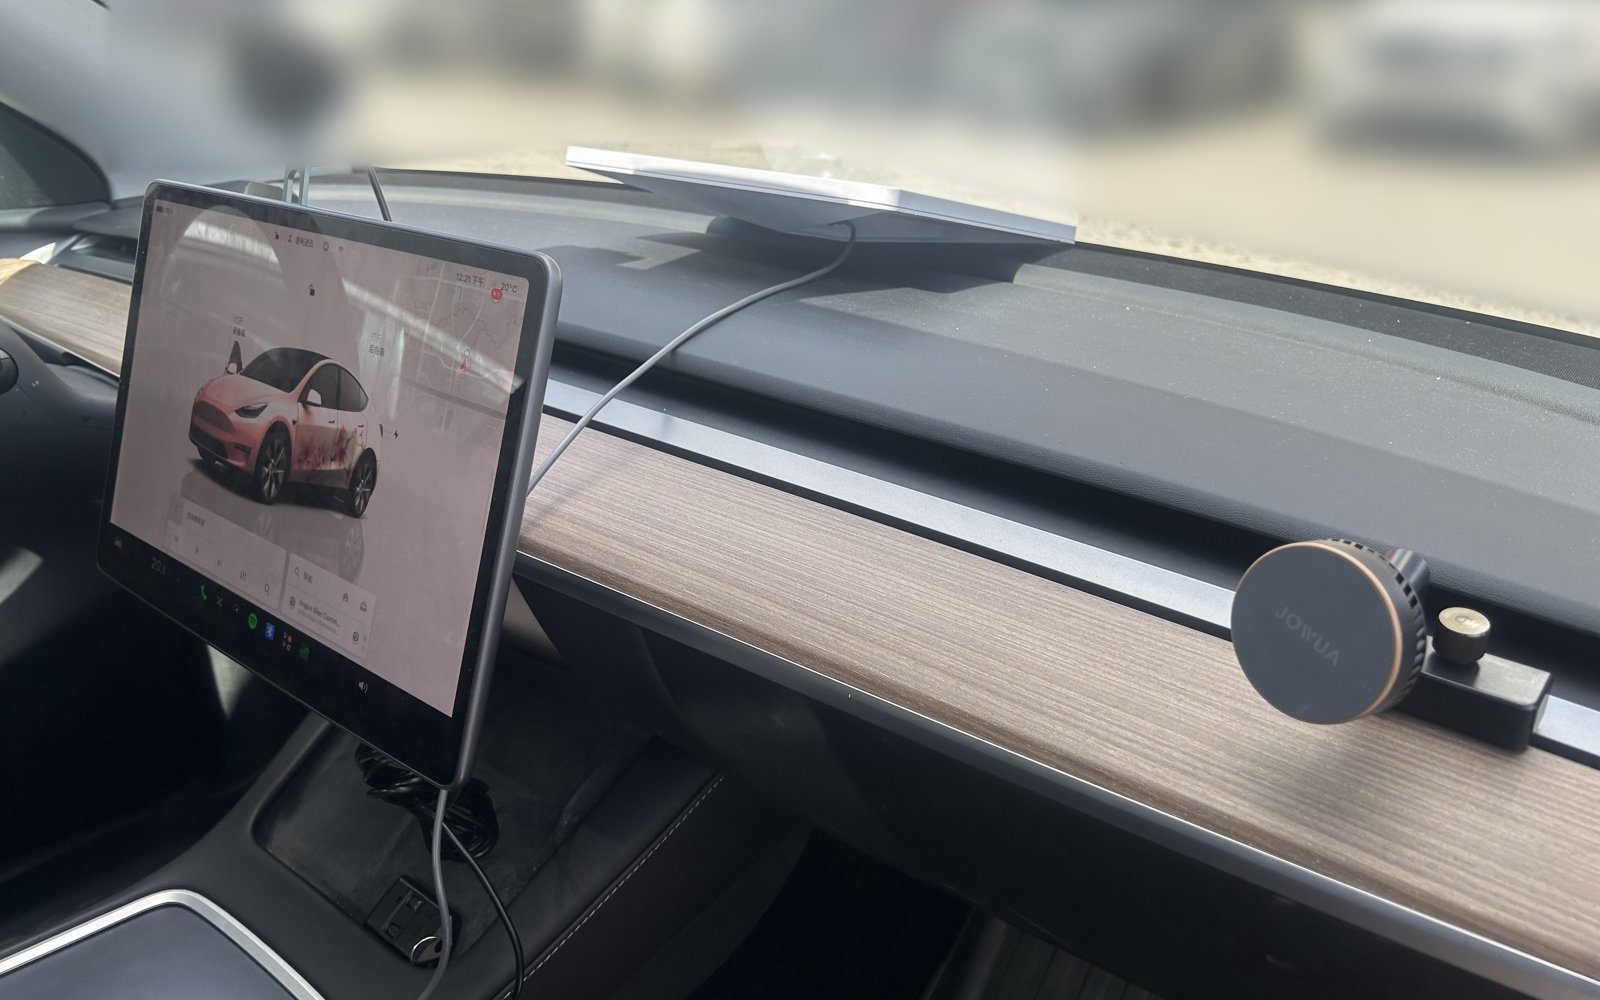
- The Mini works on the dashboard, behind the windshield. Parked, YouTube played in 1080p on the car’s screen without buffering; on the road, the car stayed connected to the Mini’s Wi-Fi.
- Power draw is small: 20 to 40 W in normal use. A full workday costs roughly 1 to 2 km of range, far less than running the climate control.
- The dashboard holds the Mini in place, but it can slide off in a hard turn. If you use it while driving, secure it with a suction or dash mount and keep it clear of the passenger airbag.
📋 Contents
- How a Tesla gets online
- Why you can’t just use the Tesla’s USB-C ports
- The Tesla 12V socket: where it is, what it delivers, and when it’s live
- Why I didn’t use a no-name adapter from Amazon
- Unboxing and build: the spec label matters more than looks
- Installing it in a Model Y: five minutes, no tools
- Is the signal good enough through the windshield?
- Using it while driving: secure it, mind the airbag, keep your view clear
- How much power does it use, and will it hurt range?
- Choosing a Roam plan (Canada vs. the US)
- Pros and cons of this setup
- Frequently Asked Questions
- The bottom line
How a Tesla gets online
A bit of background first, because many new owners aren’t sure how their Tesla connects to the internet, and so they don’t know which gap a Starlink Mini actually fills.
There are three common ways:
- The car’s built-in cellular connection. Standard Connectivity covers navigation maps, basic remote control and the Tesla app. Paid Premium Connectivity adds live traffic, satellite map view, music and video streaming. It runs on cell towers, so it’s great in the city, but once you head out of town or into the mountains you often drop to one bar or no service at all.
- A phone hotspot or home Wi-Fi. The car can join any Wi-Fi network, and software updates and Theater streaming can use Wi-Fi while parked. Same problem, though: no cell signal means no hotspot.
- A Starlink dish in the car. The Starlink Mini talks directly to low-orbit satellites, so all it needs is open sky overhead. It creates its own Wi-Fi network, and the car, phones and laptops can all connect to it at once.
If you mostly drive in the city and on major highways, the car’s own connection plus your phone’s hotspot is enough. If you regularly head to a cottage, provincial or national parks, Northern Ontario, the Rockies or remote stretches of the US West, a Starlink Mini is the only option that gives you a reliable connection where there are no cell towers.
I use mine for three things: keeping the family online on long drives, streaming and working from the car when we camp overnight, and bringing temporary broadband to a friend’s lakeside cottage on weekends. In all three cases the Tesla supplies the power and a comfortable space, and Starlink supplies the connection. The two work well together.
Why you can’t just use the Tesla’s USB-C ports
This is where most people get stuck first. The Starlink Mini accepts power two ways:
- The round DC barrel input: 12 to 48V DC, up to about 60 W.
- USB-C: the supply must deliver 20V/5A, meaning a 100W-class USB PD supply. Starlink’s help centre is blunt about it: USB PD supplies rated 65 W or less won’t run the Mini.
In normal use the Mini draws about 20 to 40 W, with brief peaks around 60 W while it searches for satellites at startup or melts snow in winter. So the real question isn’t average power. It’s whether the supply can hold a steady 20V and handle the startup peak.
The USB-C ports in the cabin look like the obvious choice, but none of the ports in the Model S, 3, X or Y output 20V. JOWUA says so on its Starlink Mini cable product page: owners of those four models must pair the cable with a high-power car charger. If you plug in anyway, the Mini usually won’t boot, or it starts and then keeps rebooting.
The Cybertruck is a little different. Its USB-C ports are more powerful, but if other devices share the same group of ports, the available power drops and the Mini may still cut out. Even Cybertruck owners are better off using the 12V socket with a car charger for a stable setup.
The Tesla 12V socket: where it is, what it delivers, and when it’s live
The other power source in the car is the 12V socket (the old cigarette-lighter style outlet) that many owners never touch. In a Model Y it’s at the very back of the centre-console storage bin: slide the lid open and reach behind. Many Model Ys also have a 12V socket on the left side of the trunk; check the trunk wall or your owner’s manual to see if yours does.
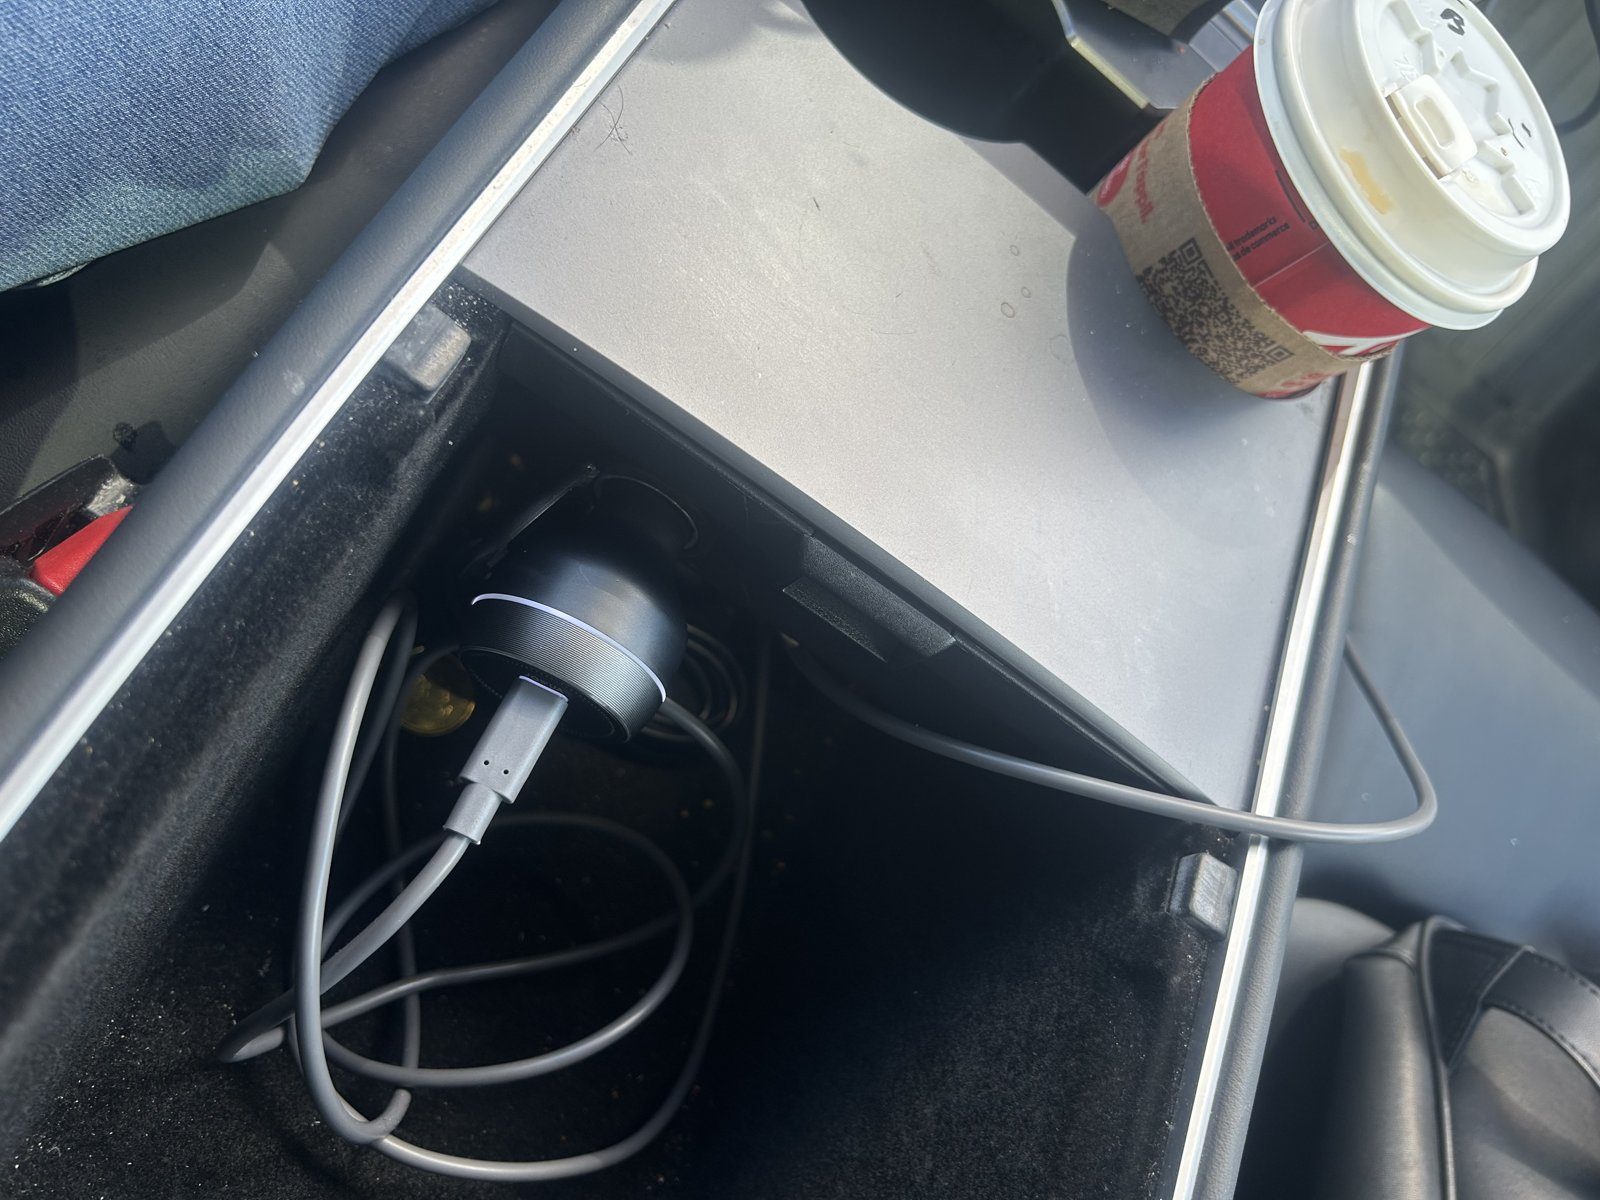
According to the “Interior Electronics” section of the Model Y owner’s manual, the socket is suitable for accessories drawing up to 12A continuous and 16A peak. At 12V that’s well over 100 W continuous, which is more than enough for a 20 to 40 W Mini.
Two Tesla-specific details to know before buying a car charger:
- The low-voltage system runs higher. The manual notes that Model Ys built from about November 2021 onward (including my 2023) use a lithium-ion low-voltage battery, and inverters or accessories plugged in must tolerate 16V DC input. Many cheap car chargers list an input range of roughly 12 to 14V, so on a newer Tesla they may misbehave or even overheat.
- The socket isn’t always live. Tesla’s 12V socket only has power while the car is in use or detects someone inside, such as a person in the driver’s seat or someone using the touchscreen. Once everyone gets out, the car locks and goes to sleep, the socket turns off, and the Mini shuts down with it. To keep it powered for long stretches, use Camp Mode; more on that in the power section below.
So a car charger that’s right for Starlink in a Tesla needs three things: an input range that covers 16V, a USB-C main port that reliably delivers 20V/5A, and a plug that sits snugly in the socket without wobbling.
Why I didn’t use a no-name adapter from Amazon
Search Amazon for “Starlink Mini car adapter” and you’ll find plenty of no-name adapters for a few dollars to a little over ten. I wasn’t comfortable putting one in my own car, for two reasons.
The first is the low-voltage system mentioned above. An EV’s 12V system isn’t the same as a gas car’s, newer Teslas run at a higher voltage, and many cheap accessories simply weren’t designed with that in mind. The second is the type of load. The Mini isn’t like a phone that draws a dozen watts for a while and stops. It’s a continuous load of up to 60 W for hours at a time. Thin wires, a loose plug or a charger that can’t hold 20V can make the dish reboot over and over or, worse, make the plug run hot. I work hands-on at a repair shop and I’m a registered automotive service technician apprentice (310S) in Ontario, so I’m cautious about anything wired into a car, especially a sustained high-power load. I’d rather use a branded product with clear specs.
I ended up with JOWUA’s kit. JOWUA is a brand that makes Tesla-specific accessories, and its Starlink Mini cable page spells out which combination to buy for each Tesla model, which is exactly what I wanted. The kit has two parts:
- USB-C to DC power cable (3 m): rated 20V/5A, with a 5.5 × 2.1 mm DC plug that goes straight into the Mini’s DC input.
- 165W PD 3.1 car charger: plugs into the 12V socket, accepts 12 to 24V input, and its main USB-C port delivers up to 140 W, including 20V/5A. It also has a second 30W USB-C port and a 30W USB-A port.
One thing to watch when ordering: don’t buy the cable alone. The product page has two options, and the cable by itself won’t work in a Model 3, Y, S or X. Choose the cable plus 165W car charger bundle. The cable alone is about US$30 and the bundle a little over US$60; check the site for current prices. Here’s the link: JOWUA Starlink Mini USB-C to DC cable (with 165W car charger bundle), and code TSLNA takes another 5% off. The charger is also sold on its own: JOWUA 165W PD 3.1 car charger, also 5% off with code TSLNA.
Unboxing and build: the spec label matters more than looks
The package arrived by DHL on September 22, just a few days after I ordered. Each item came in its own box: the cable in a hard black case, the charger in a white box.
When choosing a car charger for Starlink, the most important thing is the spec label on the back of the box. This one lists DC 12V to 24V input, which covers the roughly 16V low-voltage system in newer Teslas, and the main USB-C port’s output profiles include 20V/5A, which is what the Mini needs. The other two ports top out at 30 W each. That’s fine for phones but not enough for the dish, so don’t mix them up.
First impressions: both pieces feel solid. The charger has some heft, and the three ports are labelled PD140W, PD30W and QC30W, so it’s obvious which one is for the Mini. The 12V plug fits tightly in the Model Y’s socket and doesn’t wobble over speed bumps. The cable is thick but flexible, with a strain-relief boot at the DC end, and a strap is included for tidying the extra length.
Of course, good build quality doesn’t guarantee durability. Car accessories have to survive summer heat and winter temperatures of minus 20 to 30 degrees. I’ll come back and update this article after a few months of use.
Installing it in a Model Y: five minutes, no tools
I did the install in a parking lot on September 23, and it took a few minutes. Here are the steps:
- Plug in the charger. Slide open the centre-console lid and push the charger all the way into the 12V socket at the back.
- Use the main port. Plug the cable’s USB-C end into the port marked PD140W, not either of the 30W ports.
- Route the cable. Bring the cable out over the edge of the storage bin, away from the lid’s sliding track and the armrest hinge, so it doesn’t get pinched when you close the lid or lower the armrest. Then run it forward along the console to the dashboard.
- Place the dish. Lay the Mini flat on the dashboard, push it up against the base of the windshield, and plug in the DC end.
- Connect. Give the Mini a few minutes to find satellites, check its status in the Starlink app on your phone, then join the Mini’s network from Wi-Fi settings on the Tesla’s touchscreen.
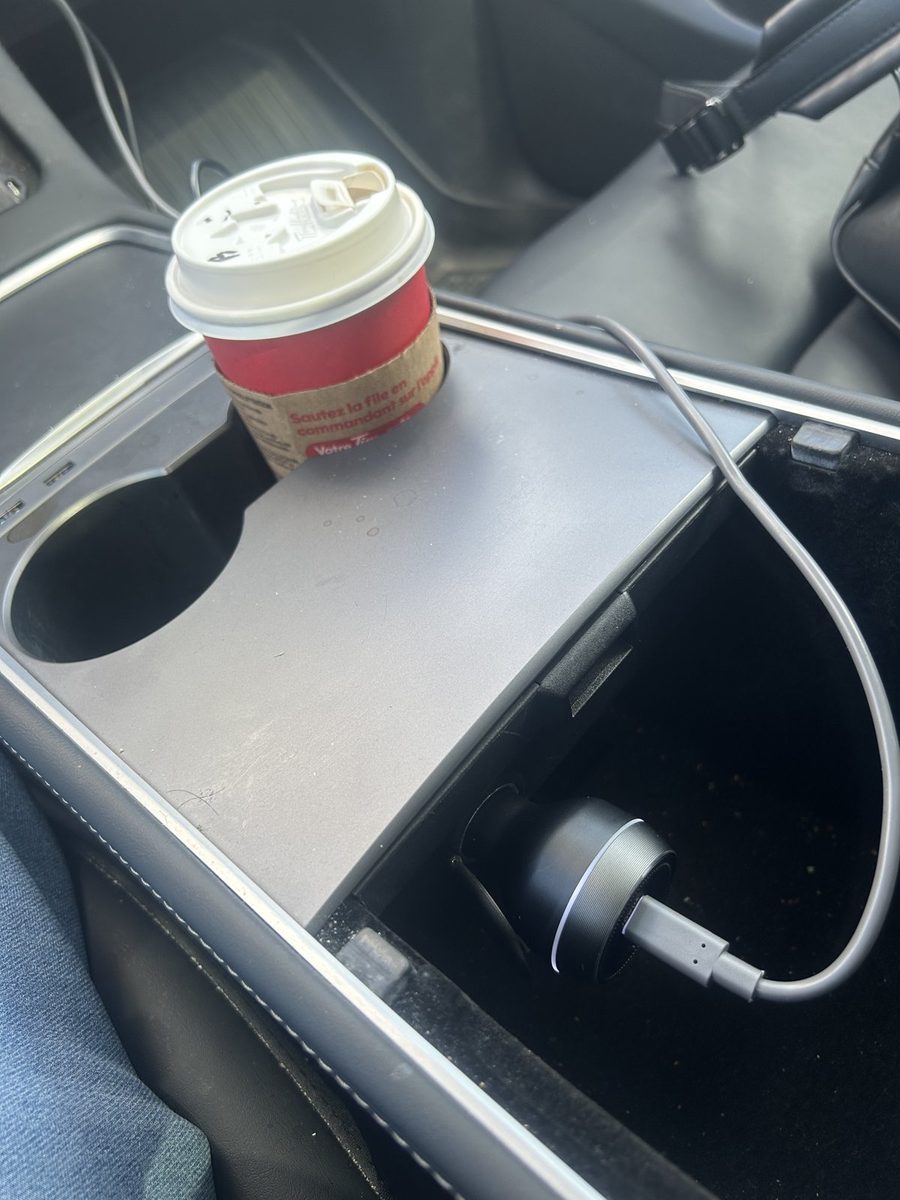
The 3 m cable leaves plenty of slack in a Model Y. I coil the extra with the included strap and tuck it beside the console. That slack is useful too: at a campsite, if you want a better signal, there’s enough length to put the dish on the roof or on the ground next to the car.
The Model 3’s 12V socket is also in the centre console area and the routing is the same, just in a tighter cabin, so the cable will feel even longer. On the Model S and Model X the socket location varies by model year; check the “Interior Electronics” chapter of your owner’s manual before you start.
One more tip: if your console bin is already packed with odds and ends, plugging in the charger and managing the cable gets awkward. A console organizer that splits the bin into layers leaves room in front of the socket. JOWUA makes these too; pick the one for your model and year.
Is the signal good enough through the windshield?
To be clear, I didn’t run a formal speed test with the dish on the dashboard. What follows is real-world experience.
Parked, YouTube in the car’s media player started instantly and played smoothly in 1080p with almost no buffering. While driving, the car stayed connected to the Mini’s Wi-Fi the whole time, and my family’s phones in the back, my navigation and my music all worked normally. Note that for safety, Tesla doesn’t allow video on the touchscreen while driving; Theater only works when parked, so watching video on the go has nothing to do with the connection.
The windshield does weaken the signal, so speeds are certainly lower than with the dish out in the open, but it’s plenty for these in-car uses. For reference, on September 14 I set the dish on the ground next to the car, powered by the car, and measured 132 Mbps down, 6 Mbps up and 21 ms latency. For a full balcony speed test in Toronto and a look at Canadian pricing, see my Starlink Mini review from Toronto.
Why the dashboard instead of the roof or rear window? Mostly because it’s easy to take with me. On the dashboard it comes off in seconds, so I can bring it to a picnic or into a cottage, and when I’m not using it there’s nothing stuck to the car that affects its looks or resale value. The Mini is also an electronically steered phased-array antenna, so unlike an old-style satellite dish it doesn’t need to be aimed precisely, which makes it fairly easy to connect from inside the car, through the glass.
One caveat: some Tesla windshields have a metallic heat-reflective coating, and some owners add tint film that contains metal. Both cut the signal more noticeably. If the signal inside the car is clearly worse than outside, try moving the dish under the glass roof or outside the car to compare, and you’ll quickly know whether the glass is the problem.
Using it while driving: secure it, mind the airbag, keep your view clear
Starlink’s Roam plans allow in-motion use, and Roam is what I have. Technically it works fine. Safety is what you really need to think about.
The gap between the dashboard and the windshield will hold the Mini, but not firmly. On straight, level roads it’s fine, but in a hard turn or sudden stop the dish can slide off and land by your feet, which is the most dangerous scenario. If you want to use it while driving, my advice:
- Always secure it. Use a suction mount or dashboard mount so the Mini can’t move; it still comes off in seconds when you need it to.
- Stay clear of the airbag. Place the dish toward the centre or driver’s side, not over the passenger airbag deployment area.
- Keep your view clear. The Mini is low when lying flat, but don’t let it block the bottom of the windshield, and never cover the camera area at the top. Autopilot and FSD (Supervised) rely on the cameras at the top of the windshield, so keep that area clear.
- Keep the cable away from the pedals. Don’t run the cable through the driver’s footwell. Do all the setup and connecting while parked, and don’t adjust the dish while driving.
Speaking of FSD, I use FSD (Supervised) for most of my long drives, and with Starlink in the car my family can use the internet comfortably from the passenger seat and the back. If you’re still shopping for a Tesla, ordering through an owner referral link currently gets you 3 months of free FSD (Supervised), worth about $297 at the $99/month subscription price. Check Tesla’s site for the current terms.
How much power does it use, and will it hurt range?
This is what Tesla owners worry about most, and the answer is: very little, close to negligible.
| Time in use | Energy (at 20–40 W) | Roughly equals in Model Y range |
|---|---|---|
| 1 hour | 0.02–0.04 kWh | under 0.3 km |
| 8 hours (a workday) | 0.16–0.32 kWh | about 1–2 km |
| 24 hours (camping overnight) | 0.5–1 kWh | about 3–6 km |
For comparison, running the A/C or heat in Camp Mode overnight often uses several kWh, and more in winter. The climate control is what eats range, not Starlink.
Three things to keep in mind:
- Sleep cuts the power. As mentioned, once the car goes to sleep the 12V socket turns off, so the Mini stops as soon as everyone leaves. To work in the car for a long stretch or stay overnight, turn on Camp Mode: the socket stays live and the climate control keeps running. I cover Camp Mode energy use and overnight tips in my Tesla Camp Mode guide.
- 12A is the real ceiling. The limit for the whole setup is the socket’s 12A continuous rating. Running the Mini and charging a phone is fine, but don’t also fast-charge a laptop from the charger’s main port for hours, since that port is already feeding the Mini. Laptops, car fridges and other higher-power gear are better off on a separate portable power station or inverter; see my Tesla mobile office guide for how I think about that.
- Snow melt uses more power. In the cold, the Mini turns on its heater and its draw moves toward the top of the range. Inside a warm cabin that barely matters, but if you set it out in the snow, expect higher consumption.
Choosing a Roam plan (Canada vs. the US)
For use in a car you want a Roam plan, not a Residential plan. Residential service is tied to one fixed address; Roam is designed for a dish that travels with you, and it allows in-motion use.
In Canada I’m on Roam 100 GB at C$75 a month before tax, and I can pause it in months I don’t need it. Canada also has larger and unlimited Roam tiers. US Roam plans have different prices and tiers, Starlink changes its pricing often, and hardware promotions vary by region, so always check the order page on starlink.com for current prices. I’m only quoting my own bill here.
If you already have Starlink Residential at home, check your account before buying a Mini: Starlink has been offering Residential customers in Canada a Mini travel kit as a rental that pairs with a discounted Roam plan (the rental fee is waived on Residential Max and for invited customers). These offers vary by address and change often.
Choosing a plan is straightforward:
- Occasional weekend camping and a few road trips a year: take the lowest Roam tier, turn it on in peak season and pause it the rest of the year to keep the annual cost down.
- Full-time RV life or remote work from the car: consider a larger tier, since video calls and big file syncs use a lot of data.
- Frequent drives between Canada and the US: Roam covers both countries, but there are limits on extended use outside your home country, so check coverage and terms for your destination in the app before you leave.
Canadian readers: don’t have a Starlink Mini yet?
First check which Mini kit offers and Roam plans are available at your address. If you order through my Starlink referral link, Starlink gives you one month of service free once you’re activated, credited on your second bill, and hardware and plan prices are the same as ordering direct. Starlink’s referral program requires both people to be in the same country, so this only works for new customers with a Canadian service address. US readers can’t use it.
Pros and cons of this setup
After using it for a while, here’s my take.
Pros:
- It solves the root problem of the Tesla’s USB-C ports lacking voltage. The Mini gets steady power and hasn’t gone into a reboot loop once.
- No wiring, no modifications, no drilling. It plugs in and out in seconds, with no effect on the car’s warranty or resale value.
- The charger’s input range covers 16V, so it suits the lithium low-voltage system in newer Teslas, and the build quality is clearly better than no-name adapters.
- Even through the windshield it handles HD video in the car and several people online at once.
Cons:
- You have to buy two pieces, and the cable-only option on the product page makes it easy to order the wrong thing.
- The 3 m cable is on the long side inside a Model Y, so you’ll need to tidy it. On the other hand, it makes it easy to move the dish outside the car.
- The charger takes the console’s only 12V socket, so if you normally keep a tire inflator or something else plugged in there, you’ll be swapping back and forth.
- If you drive with it on the dashboard, you’ll need to buy a suction or dash mount as well.
Who it’s for: Tesla owners who often drive, camp, fish or ski in places with poor coverage, have a cottage, or need to work remotely from the car. If you only commute in the city, the car’s built-in connection plus your phone’s hotspot is enough, and there’s no need to take on another monthly bill just for the novelty.
For the bigger picture on pairing the two, see my Starlink + Tesla road trip and camping guide. If you’re still deciding which Tesla to buy, my Model Y price guide for Canada covers trims, taxes and delivery times, plus why the Model Y makes such a good camping car.
Frequently Asked Questions
Can a Starlink Mini be powered from a Tesla’s USB-C port?
No. Over USB-C the Mini needs a 20V/5A PD supply, and 65 W or less won’t run it. The USB-C ports in the Model S, 3, X and Y don’t output 20V. The right approach is a car charger in the 12V socket whose main USB-C port supports 20V/5A, with a USB-C-to-DC cable to the dish.
What do I need to run a Starlink Mini in a Tesla Model Y?
Two things: a high-power car charger for the 12V socket with an input range that covers 16V and a USB-C main port that outputs 20V/5A, plus a USB-C-to-DC cable for the Mini’s DC input. I use JOWUA’s cable and 165W PD 3.1 car charger kit; code TSLNA saves another 5% at checkout.
Can the Tesla 12V socket handle a Starlink Mini?
Yes. The Model Y’s 12V socket is rated for 12A continuous and 16A peak, far more than the Mini’s typical 20 to 40 W. Just note that cars built from about November 2021 run a higher-voltage low-voltage system, so the charger must accept 16V input.
Does Starlink keep working after I lock the car and walk away?
Not by default. Once you leave and the car goes to sleep, the 12V socket turns off and the Mini shuts down. To keep it running, turn on Camp Mode, which keeps the socket powered.
How much range does Starlink use in a Tesla?
Very little. At 20 to 40 W, an eight-hour workday uses about 0.16 to 0.32 kWh, the equivalent of 1 to 2 km of Model Y range, far less than running the climate control.
The bottom line
Putting a Starlink Mini in a Tesla really comes down to one technical problem: power. Once you understand that the USB-C ports can’t supply 20V and you need to go through the 12V socket, the rest is choosing a reliable car charger, routing the cable well and securing the dish. For some tens of dollars in accessories, your Model Y gets a connection that doesn’t depend on cell towers. You can stay online while camping, on long drives and at the cottage, with almost no effect on range.
Tesla and Starlink are two pieces of the same ecosystem: one provides a space that moves and the power to run things, the other provides a connection wherever you go. For Canadian owners who spend a lot of time on the road, it may be the most useful piece of gear to add after taking delivery.
JOWUA Tesla accessories offer: the Starlink cable and 165W car charger in this article come from JOWUA, which makes accessories for the Model 3, Model Y, Model S, Model X and Cybertruck. Shop through our tslna partner link and enter code TSLNA at checkout for 5% off. Orders over US$130 ship free worldwide by DHL Express in about 5–7 days, with duties and taxes prepaid (DDP), so readers in the US and Canada don’t pay anything extra on delivery.
About the author: Lifei Zhou is a Tesla Model Y owner in the Greater Toronto Area and runs tslna.com. He bought his Starlink Mini with his own money in September 2026 and pays monthly for a Roam plan. The JOWUA cable and 165W car charger in this article were provided free for review; JOWUA did not review or influence the content.
Sources and currency: this article draws on Starlink’s official Mini specifications and help-centre articles on Mini power and USB PD requirements, the “Interior Electronics” chapter of the Tesla Model Y owner’s manual (12V socket ratings and 16V input note), JOWUA’s product pages for the cable and 165W PD 3.1 car charger, and the author’s own use of a 2023 Model Y with a Starlink Mini on Roam 100 GB. Information is current as of September 2026. The Roam price is the author’s Canadian bill before tax in CAD. Starlink and JOWUA prices can change at any time; the official order pages govern.
Disclaimer: this is a personal account of real-world use, not purchase advice. Follow your owner’s manual when connecting electrical accessories, put driving safety first when using any device on the road, and follow local traffic laws. This article contains referral and affiliate links; ordering through them may earn me a small reward at no extra cost to you. See our disclosure page.
Photo credits: all photos were taken by the author, Lifei Zhou, in his own 2023 Tesla Model Y. They first appeared on his Starlink news site WeConnectSky and are used here with permission.

About the author: Lifei Zhou
Lifei is a Tesla owner based in Canada, writing practical, fact-checked Tesla guides for US and Canadian drivers — buying, ownership, insurance, charging, and TSLA investing, all from first-hand experience.
